Week 2: Summer Internship

This week I continued working on 3D asset creation. My basic approach so far has been to start with a simplified geometry from Fusion 360, then export that design as an .FBX (Autodesk Maya file format), import the FBX to Blender for UV mapping, material, and motion rigging. There’s probably a more streamline way to generate this content, but from a feasibility standpoint, this approach allows me to be flexible and to use different tools for discrete tasks. This week I will be importing these combined assets into Unreal Engine.

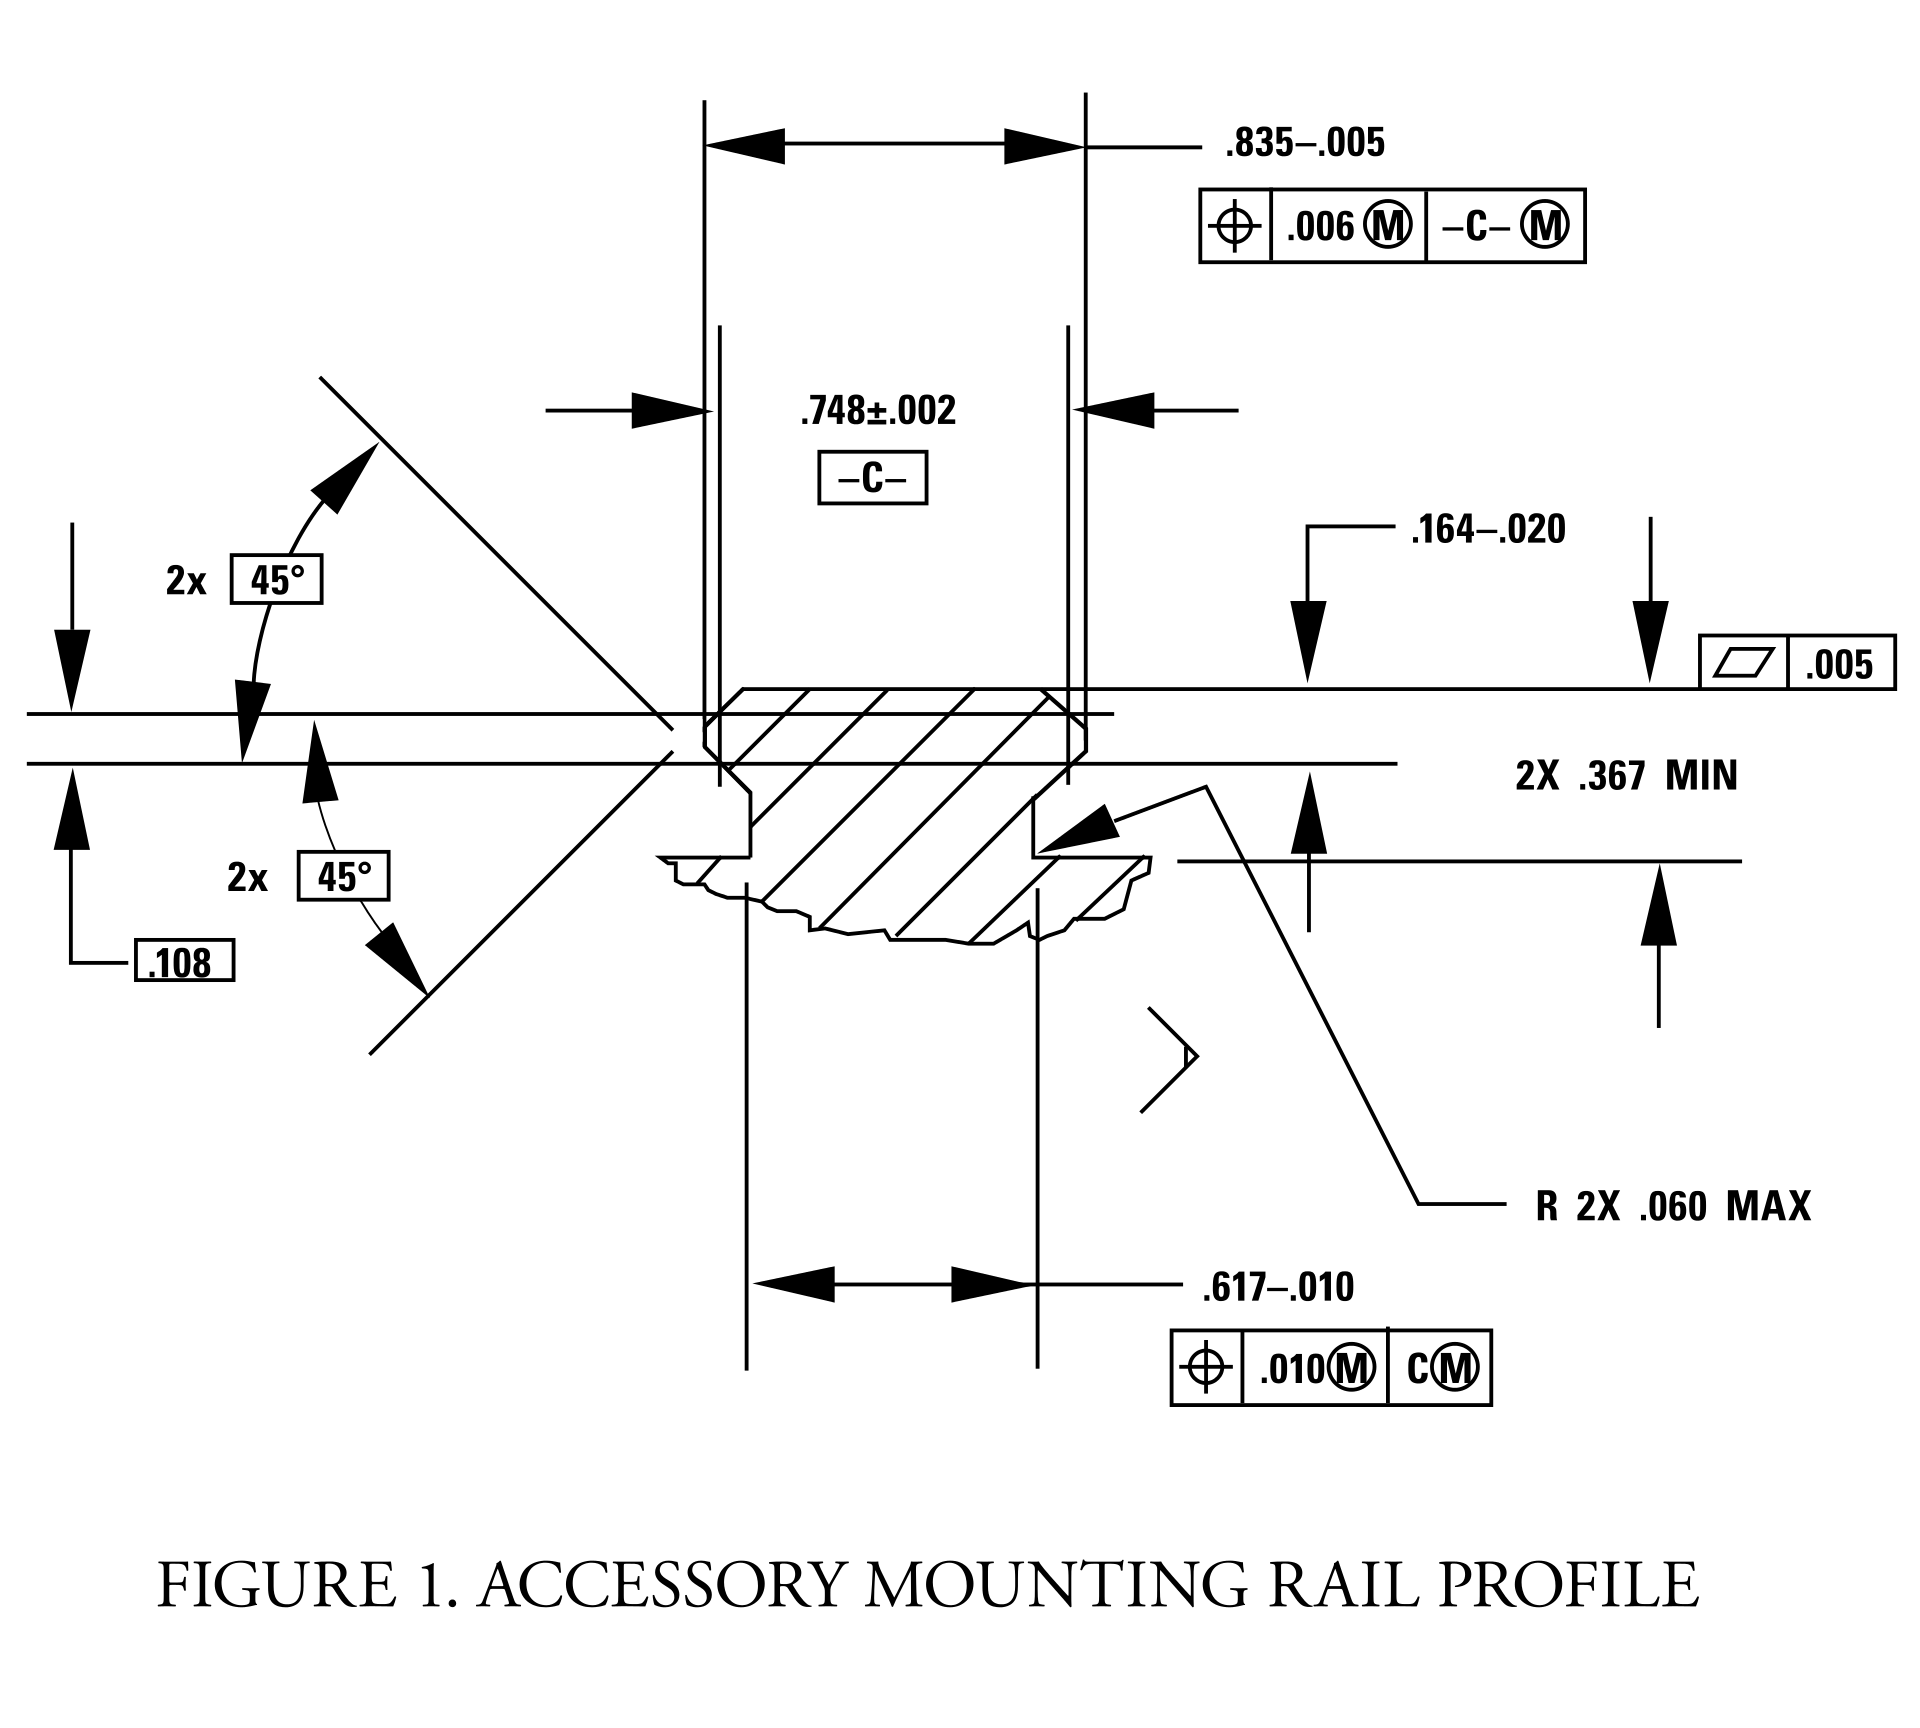
This week was also my final week for the term at PCC, where I have enrolled in their online course for Advanced Fusion 360. I’ve been working on a group project, and designing assemblies for use in a solar projector system. The design is based on COTS (commercial off-the-self parts), which required me to draft profiles to meet engineering specifications.

Picatinny rail specification downloaded from wiki-commons.

Picatinny rail specification downloaded from wiki-commons.

The final deliverables are due this coming Saturday, and there is still a good bit of work to be done before we get graded on this project. Nevertheless, I am very pleased with the current state of things. I’ve been using Quixel Mixer to produce more realistic rendering material than the library included with Fusion 360. I say, “more” realistic because Fusion 360 already has some excellent materials. Take a look at this rendering of a Bushnell 10x42 monocle (one of the components in this project):

Bushnell Legend 10x42 Ultra HD Tactical Monocular Black rendering v14.png

I haven’t yet added any details, but as you can see, the rubberized exterior and textured plastic hardware are fairly convincing. Now, take a look at the mounting hardware rendered with Quixel textures:

Picatinny rail bracket rendering v7.png

An important component in photorealism is the inclusion of flaws. Real life objects are never perfectly clean, perfectly smooth, or with perfect edges. Surface defects, dirt, scratches, and optical effects play an important role in tricking the eye into believing a rendering. With Quixel Mixer, it is possible to quickly generate customized materials. While this product is intended for use with Unreal Engine and other real-time applications, it does an amazing job when coupled with a physical based renderer.

Picatinny rail set with hardware and bracket.

Picatinny rail set with hardware and bracket.

I’m excited to see what can be done with these materials in a real-time engine, especially given the advanced features of Unreal Engine 5. Fusion 360’s rendering is CPU driven, whereas Unreal is GPU accelerated. With both Nvidia and AMD now selling GPUs with built-in raytracing support, it won’t be long before we see applications that offer simultaneous photorealism rendering within modeling workflows.

Additionally, GPUs also work extremely well as massively parallel computing units, ideal for physical simulations. This opens up all kinds of possibilities for real-time simulated stress testing and destructive testing. It wasn’t that long ago that that ASCI Red was the pinnacle of physical simulation via supercomputer. Today, comparable systems can be purchased for less than $2,000.

Of course, this price assumes you can buy the hardware retail. The current chip shortage has inflated prices more than 200% above MSRP. Fortunately, with crypto markets in decline and businesses reopening as vaccination rates exceed 50% in some regions, there are rays of hope for raytracing-capable hardware being in hand soon.
Week 14 update: The Late Edition

The final push is now upon us. This past week I’ve been working nearly around the clock with my team, pushing to bring about our future vision. One of the most labor intensive, yet rewarding parts of this project has been the production of a newscast from the future. We’ve made countless script revisions, scraped stock images, sound, footage, and crafted motion graphics elements to bring this story to life. It’s been challenging, but I’m excited to see the final results.

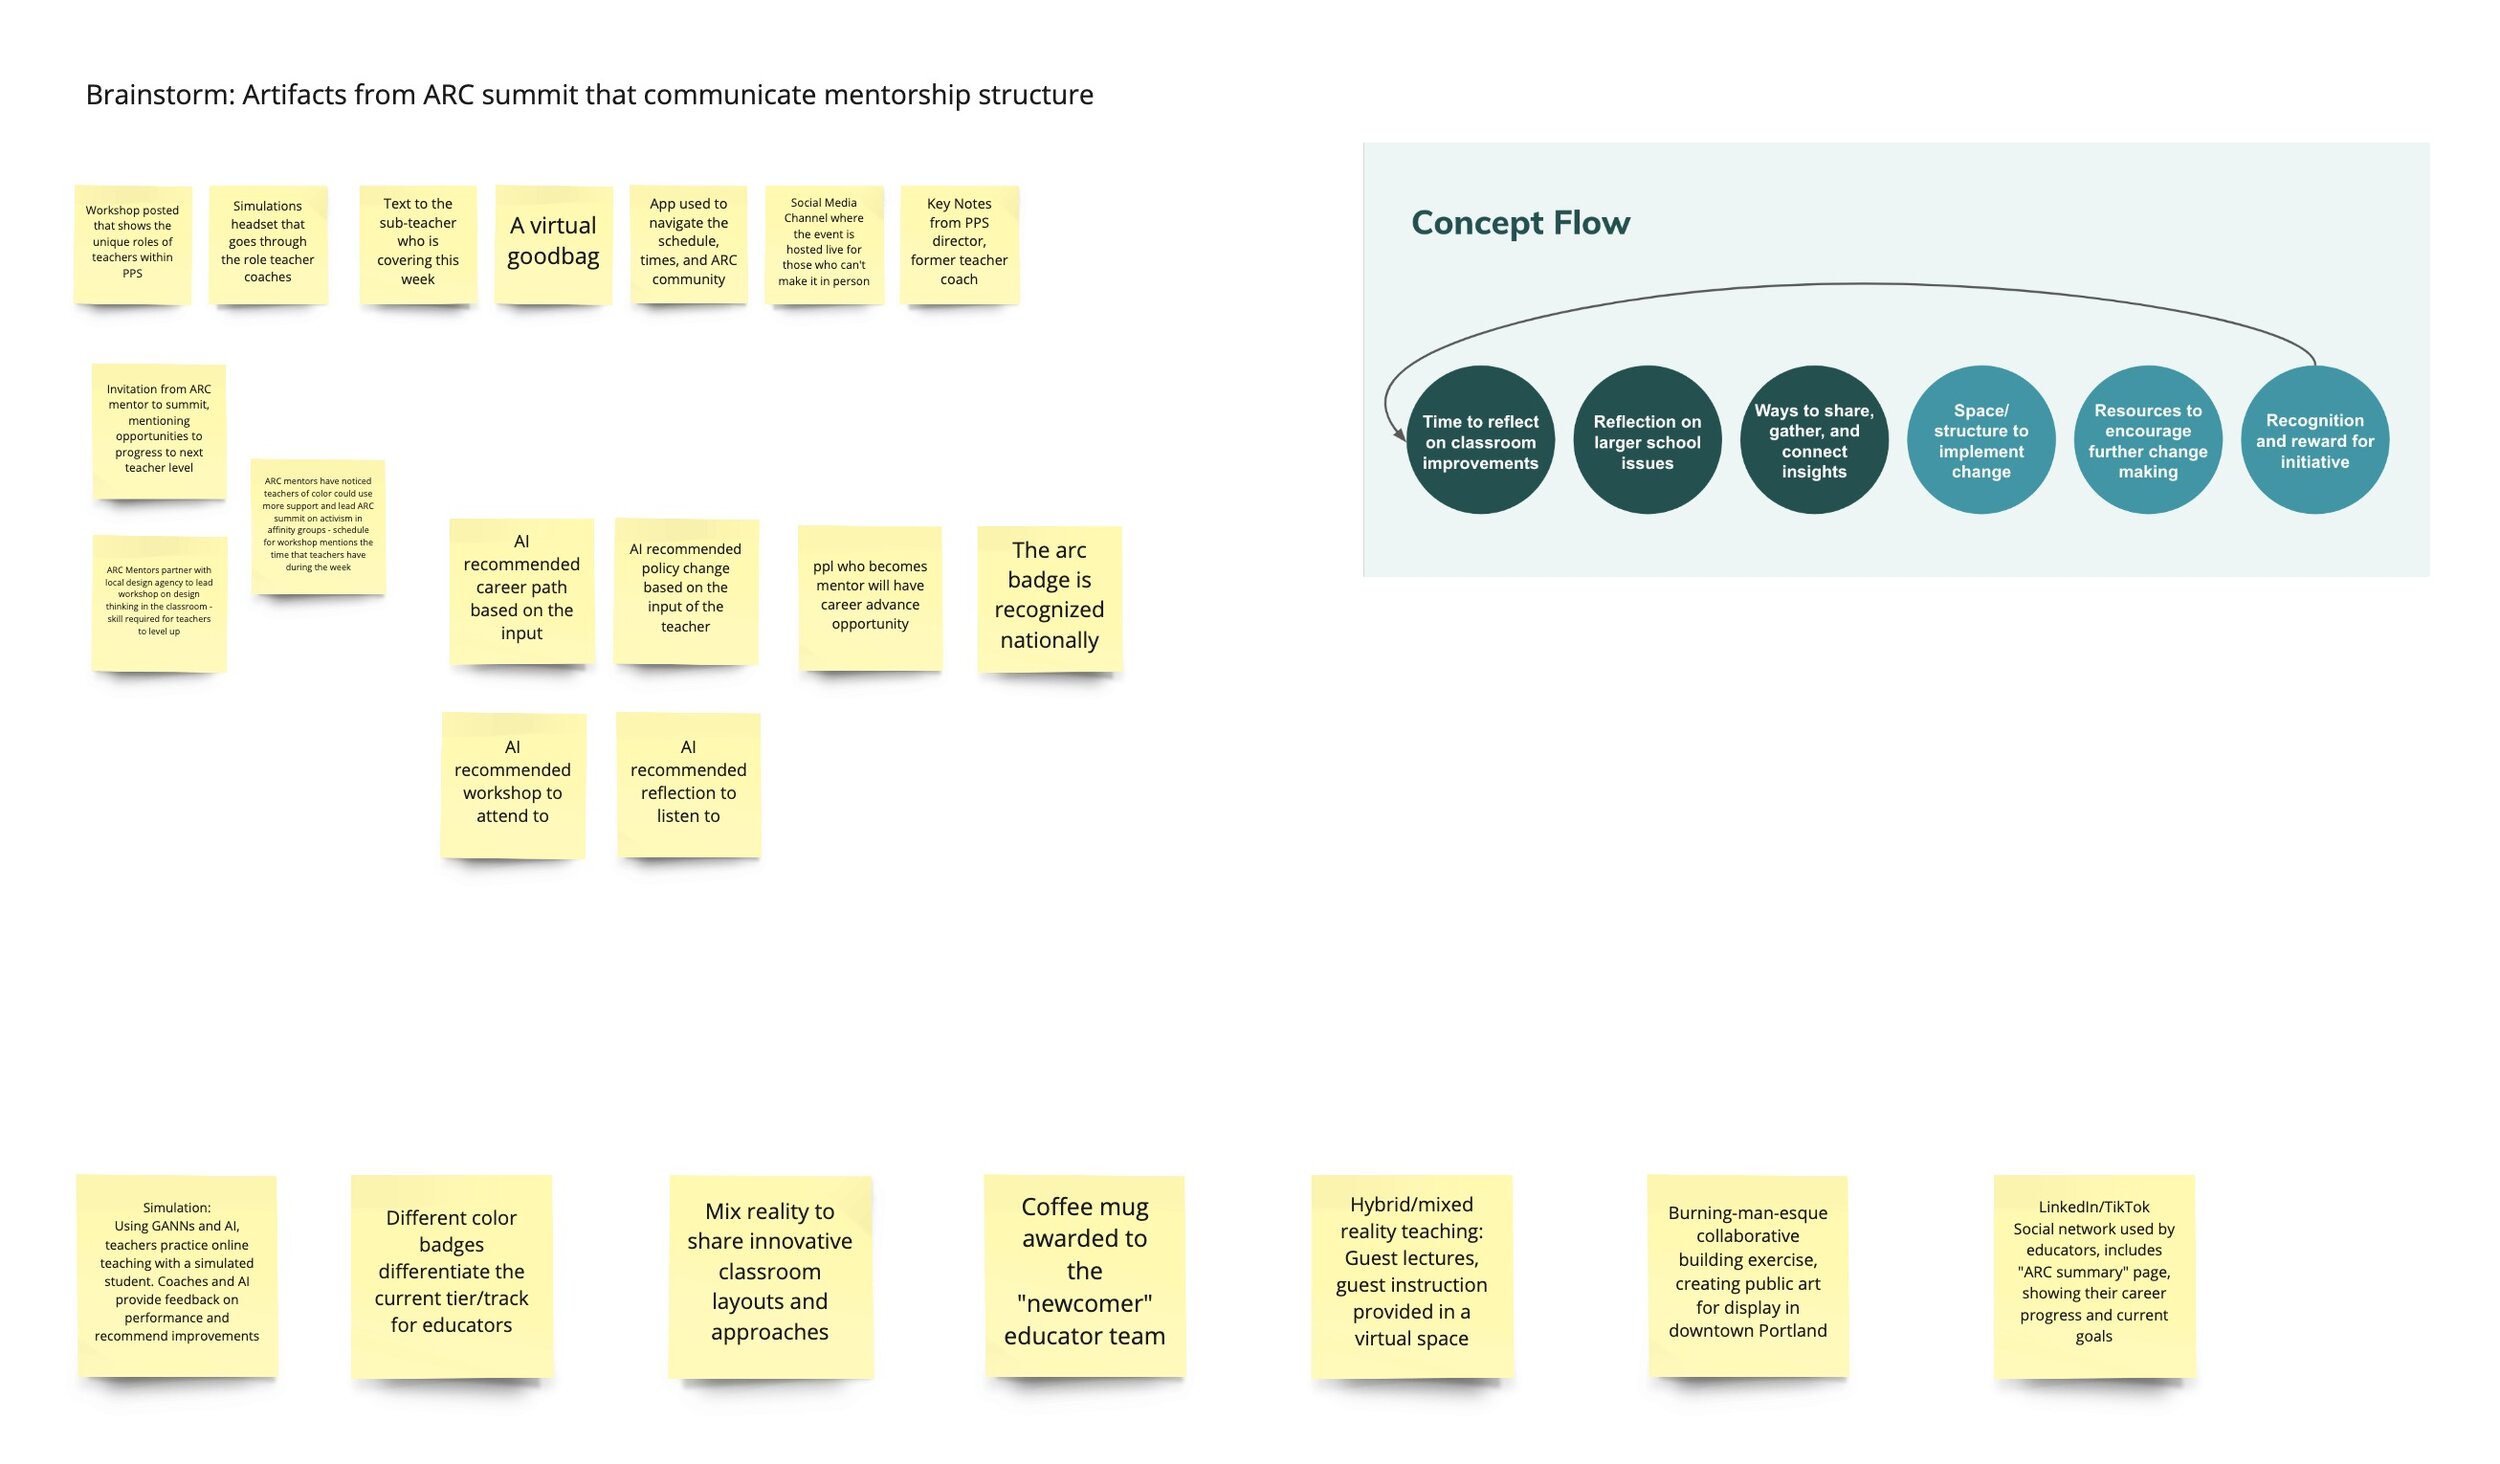
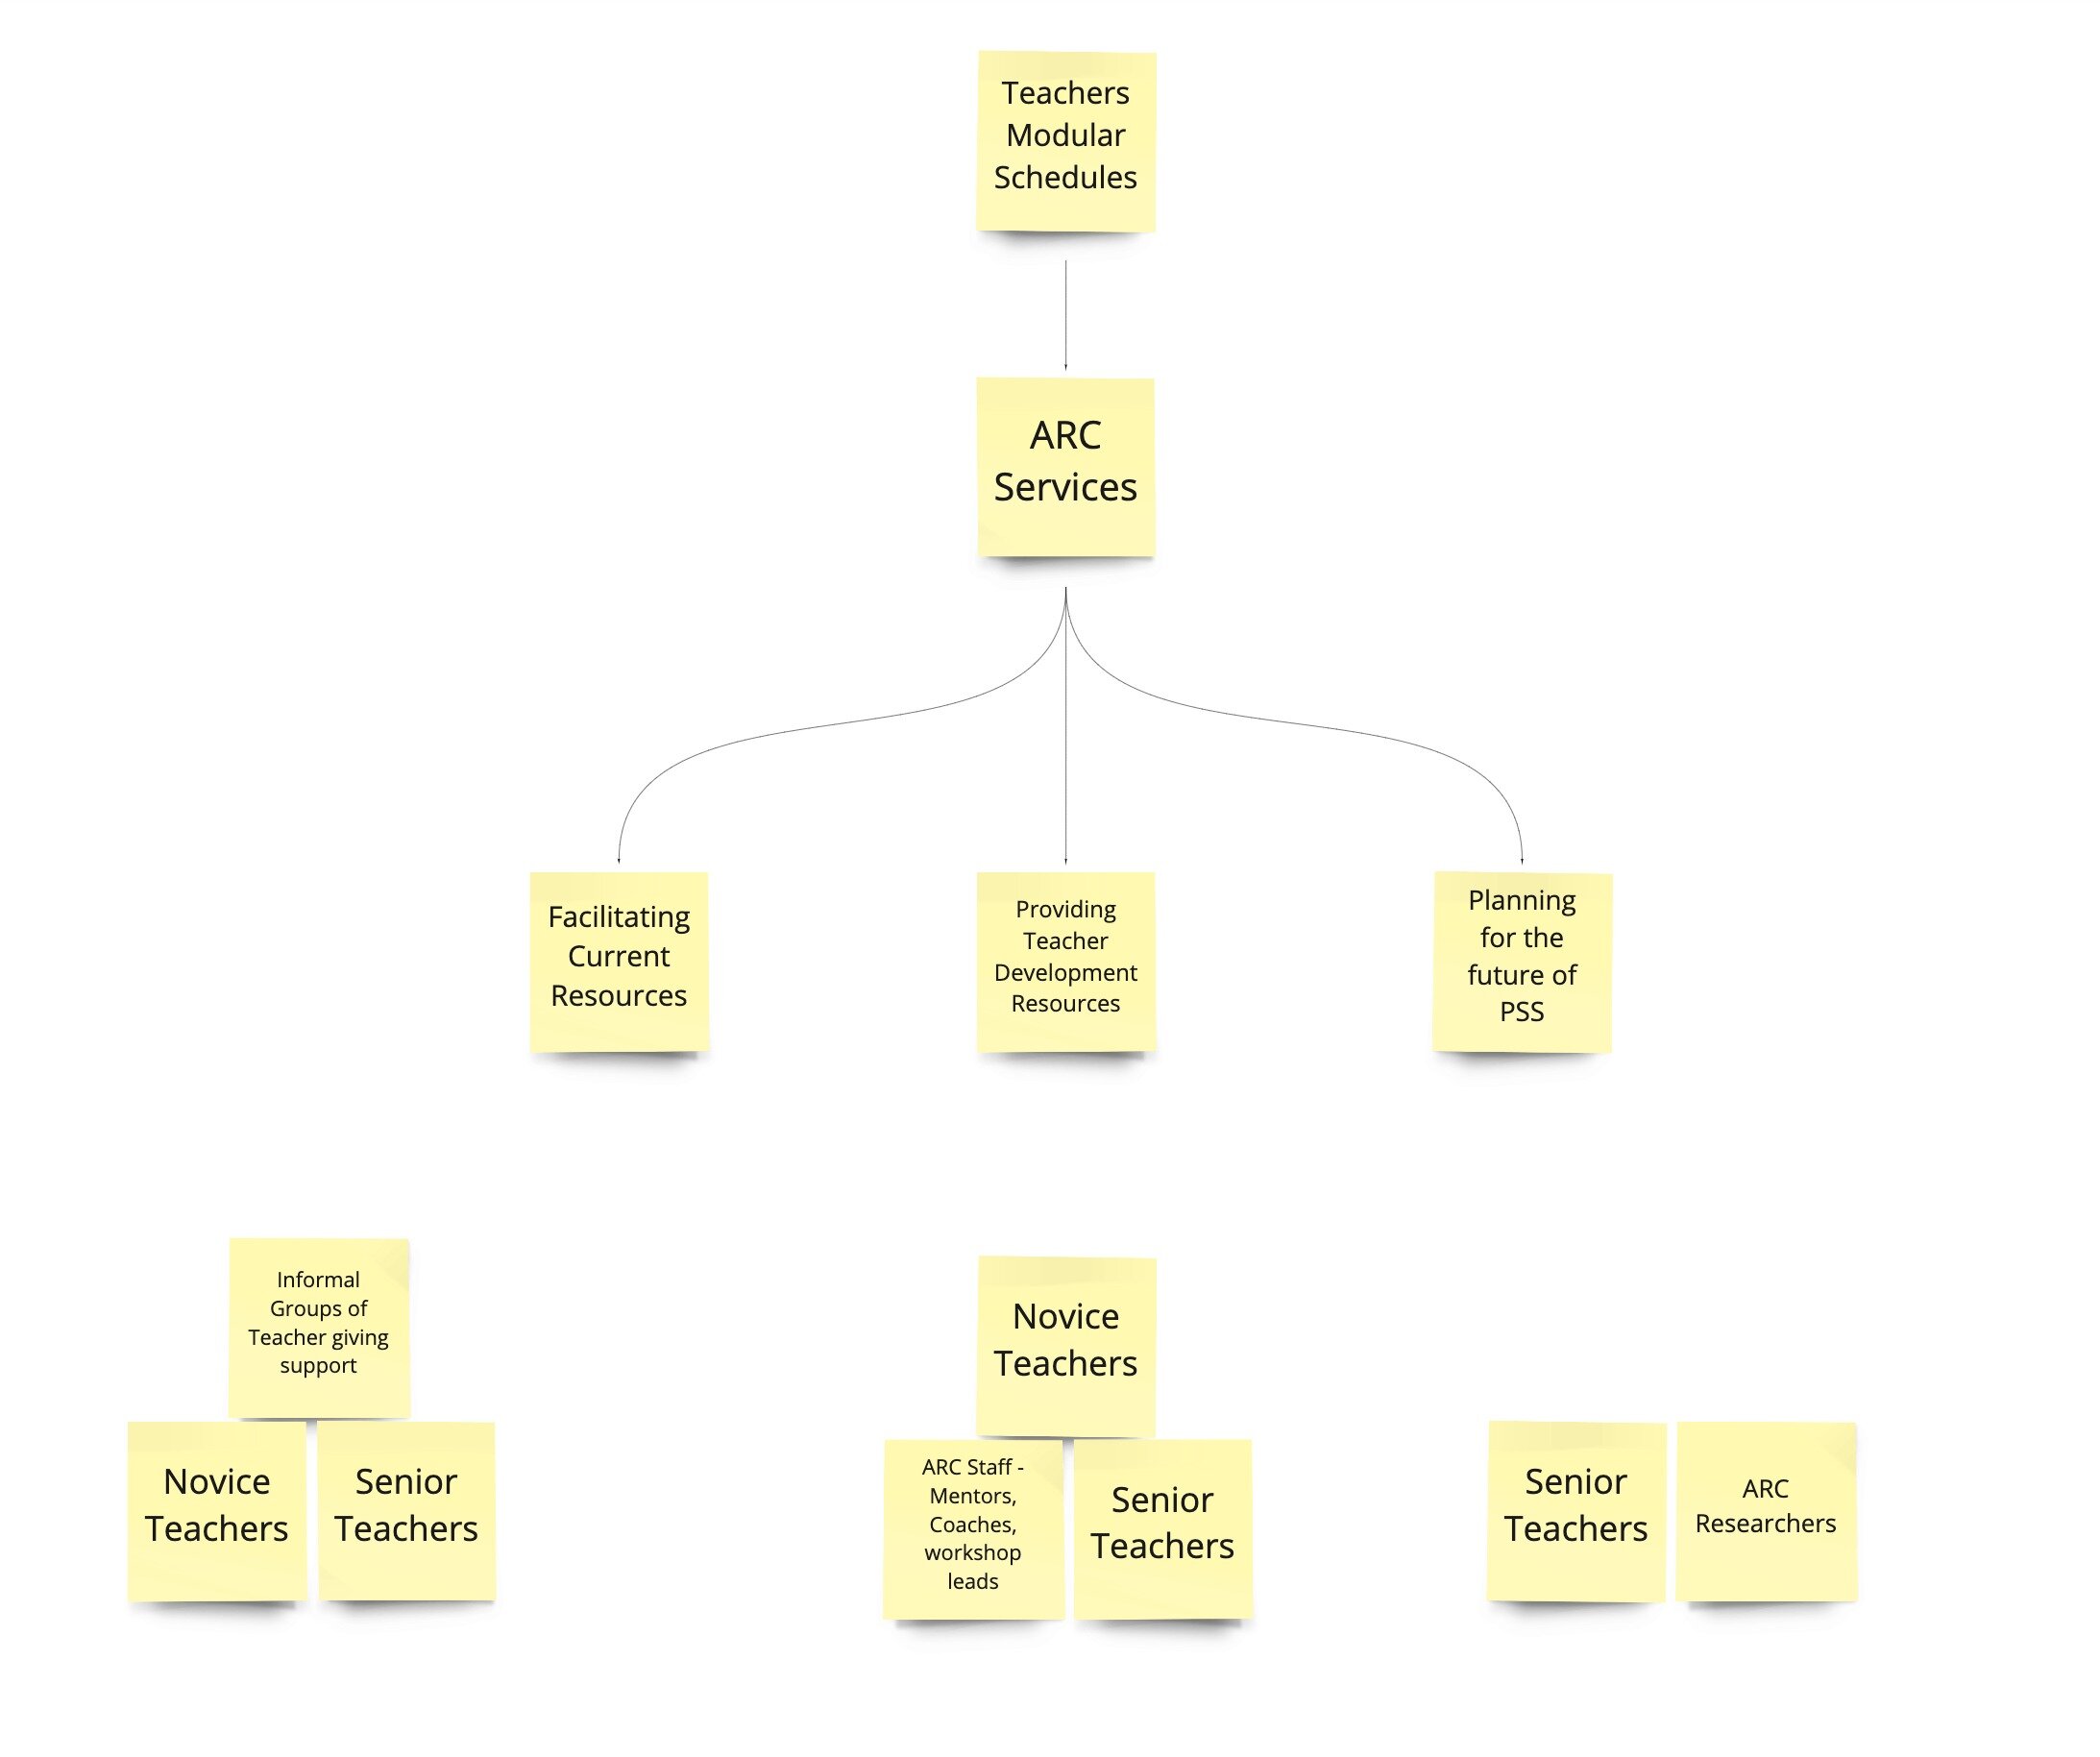
What’s working: our approach to generating a video is deeply grounded in research. We’re incorporating concepts generated with participants — public educators who so generously gave us their time and perspectives on the present and future state of teaching in American schools. We’re also building our story to represent several systems-level shifts, including national legislation, teachers union contracts, and individual school reforms. We used several different futuring frameworks to develop these narratives, including: cone of possibility, backcasting, STEEP+V, Multilevel Perspective mapping, affinity mapping, and worldview filters.

Concepts+ MCCC - Version 2 MLP and STEEP+V Sorting.jpg
MLP_Past.png
futurescone-cdb-4.png

This process has been anything but precise. The future is something we build, not something we predict through careful measurements of trends. Understanding this truth has been very reassuring. Now that we are approaching a conclusion, I feel as though I have been on a long drive through undeveloped territory. The daylight of exploratory research gave way to the twilight of generative research and in the pitch of night we evaluated concepts. With only one headlight, we squinted off into the distance, to read the signs. Sometimes the precipitation of a pandemic obscured everything, but we relished the intermittent moments of clarity.

Those latter kinds of moment were by far the most exciting. “Oh, oh, what if…” was a common preamble to productive yet heady conversations with peers over zoom, as we scrambled together various visual representations in Miro and Figma. 

Concepts+ MCCC - Frame 26.jpg
Concepts+ MCCC - Frame 28.jpg

This workflow has been essential to synthesizing content and a visual language for our video, which we’ve been iterating on through various stages of prototyping. I’m concerned about the overall fidelity and recognize that this will be important to suspension of disbelief for our intended audience — policymakers and various stakeholders connected to PPS must find this artifact compelling enough to act and bring these concepts into a shared reality.

Concepts+ MCCC - Frame 29.jpg
Concepts+ MCCC - Frame 30.jpg
Concepts+ MCCC - Frame 31.jpg

On the technical side, video editing and motion graphics are computationally intensive tasks. I built a beefy workstation prior to starting at CMU, and this machine has been essential to so many tasks and assignments. Nevertheless, I’ve found that this work has strained my system’s capacity. I’ve purged files to make room for temporary caching and rendering outputs. I’ve reset my router in a desperate effort to speed up the transfer of data to Google Drive, and ran my system in a barebones state to maximize resources available to Adobe CC’s memory-hungry apps.

The stress I place upon the tools I use to design are complemented by the stress I’ve applied to myself. My sleep has been intermittent. I take short naps on the couch and found myself on more than one occasion this week working through the sounds of birds before the break of dawn. These late night hours are quiet and free of distraction, but tend to make the day that follows less than appealing. I’m staying awake through this last week of lectures, but finding my mind trailing off into thoughts about the timeline and how I might optimize frame rates for nominal render times. I’m obsessed with getting this video done, but know that this pace is not sustainable.

Gummi Bears

I’m spread pretty thin between projects, but wanted to post some new renderings. One of the benefits of Fusion 360 is the materials customization built into their rendering pipeline. And I think this project does a good job of highlighting this feature.

I’m kicking myself for not rendering at a higher resolution, but this lighting test did a fantastic job of demonstrating refraction with a slightly rough surface.

I’m kicking myself for not rendering at a higher resolution, but this lighting test did a fantastic job of demonstrating refraction with a slightly rough surface.

While the angle and lighting are more traditional (i.e., less creative) for a rendering shot, I’m including it because of the shadows and light transmittance between materials. This is the kind of thing that only looks convincing with ray tracing. R…

While the angle and lighting are more traditional (i.e., less creative) for a rendering shot, I’m including it because of the shadows and light transmittance between materials. This is the kind of thing that only looks convincing with ray tracing. Raster engines cannot accurately simulate light passing and reflecting off of materials like this.

I have a render running in the cloud right now for a scene with roughly 250 of these gummies piled on top of one another. With so many surfaces and ray transformations and generations coming from such a complex model, I cannot render it to useable resolutions locally. You can see the rest of my renderings and download the models for yourself on GrabCad.

Mac Mini 2018 in Fusion 360

This month cruised by fast. I have been spending the bulk of my time in Fusion 360, both for class projects, as well as personal exploration of the software. Here are some recent renderings:

Apple updated the Mac Mini last month, adding an optional 6-core Intel Coffee Lake (Core i7 8700B) processor configuration, Thunderbolt 3 (USB Type C interface), and a “Space Gray” makeover. using photos from Apple’s product page, I reconstructed th…

Apple updated the Mac Mini last month, adding an optional 6-core Intel Coffee Lake (Core i7 8700B) processor configuration, Thunderbolt 3 (USB Type C interface), and a “Space Gray” makeover. using photos from Apple’s product page, I reconstructed the IO layout and customized material and appearance settings. You can download my model here.

Opposite angle, to show off that sweet white LED!

Opposite angle, to show off that sweet white LED!

For anyone getting into CAD, I also recommend GrabCAD.com, where you can download (and contribute) 3D models for free! I was able to accelerate my workflow by downloading prebuilt models of the ethernet, USB, and HDMI ports.

A Robot Took Your Job

Last week I returned from my trip to Memphis (thanks, Andy! Hope Meara’s potty training is going well!) and I’ve been playing catchup ever since. I’m getting back into Fusion 360 with some more challenging projects. This week we covered how to use joints in assemblies. This is pretty wild stuff. You can download models from GrabCAD.com and upload them Fusion 360. It auto-magically converts models to work natively (with mixed results) in the work space. From there, you can define joints and move parts in real time! We did this in class using an industrial robot model. Of course, this meant the robots needed to fight…

Four robots go in, four robots come out. Because they are metal, and very strong, and even knives won’t kill them!!

Four robots go in, four robots come out. Because they are metal, and very strong, and even knives won’t kill them!!

This wasn’t the actual assignment. Instead we needed to create a render scene involving an earlier model from this class being assembled by robots. I was grinding away at this all day yesterday, and finally got around to rendering it. Because of the complexity of the scene, it’s taking quite some time to bake in all of those rays at HD+ resolution. Here’s the object being assembled for reference:

This is based on an existing design from a vinyl shelf I bought to keep my Laserdisc collection in prime display condition. I fantasized about having an actual product made for Laserdisc, and what that might look like. You gotta with red trim right?…

This is based on an existing design from a vinyl shelf I bought to keep my Laserdisc collection in prime display condition. I fantasized about having an actual product made for Laserdisc, and what that might look like. You gotta with red trim right? Because LASERS!!

Here’s a technical drawing, if you want to build your own. This will probably hold about 250 titles, based on my experience with my current shelf ( tweaked the dimensions to give it a bit more depth and room to breathe between stacks.

Here’s a technical drawing, if you want to build your own. This will probably hold about 250 titles, based on my experience with my current shelf ( tweaked the dimensions to give it a bit more depth and room to breathe between stacks.

i’ve been taking this class as an opportunity to not only learn the software, but also to push the limits of what the software can do. For me, this practice is like cartography. I’m mapping the borders by extending to the edge in all things. With this project, I wanted to not only torture test the rendering pipeline, but also test the limits of my beefy Hackintosh. As noted previously, my CPU appears to be the main bottleneck. But I wanted to see what it takes to exceed memory requirements. For this design and ray tracing session I’m utilizing ~25 GB of memory, and cooking my poor little quad-core Haswell® chip.

Nothing cooks like CAD! Note that the temperatures reflect a system with AIO liquid cooled CPU, and nine total fans, packed into an old PowerMac G4 case. Even when protein folding on both GPU and CPU, the system usually has a CPU core temperature ce…

Nothing cooks like CAD! Note that the temperatures reflect a system with AIO liquid cooled CPU, and nine total fans, packed into an old PowerMac G4 case. Even when protein folding on both GPU and CPU, the system usually has a CPU core temperature ceiling of about 70˚ C.

It’s been over four hours as of writing this, and the rendering has not yet reached “final” quality. Scene complexity is a huge factor in rendering time.